How to "Field Measure" Your Space for Furniture
Dec 29, 2019
Before you buy any furniture or decor for your short term or vacation rental, it's a good idea to do some planning!
If you've read any of my blogs or taken my e-course on Airbnb Design, you'll know starting with a plan is the cornerstone for success in decorating and designing any space.
Let's start at the beginning:
A floor plan is a scaled visual representation of a room or building with the view from above. A floor plan will help you understand the ideal layout and flow of your space, and what size furniture you need for each room.
The first step in creating a floor plan is to collect some measurements of the area or areas you're hoping to draw. In the design industry, these are called "field measurements." You can do this one of two ways:
- By hand with pens and paper
- Digitally with an app like MagicPlan
For the old school pen and paper method, see my below step-by-step guide. If you want to go the digital route, which would be faster, download the MagicPlan app and check out their savvy tutorials before you get started.
How to Gather Field Dimensions by Hand
Okay, for the less tech savvy old souls of the world, this tutorial is for you! There's something so satisfying about drawing out a floor plan by hand. This is how I've gathered field measurements for interior spaces for years.
Tools You'll Need:
- Graph Paper (or plain white paper)
- Pens (I like to use a couple of different colors as my drawings show)
- Tape Measure (Ideally at least 25 feet long)
- Phone Camera
STEP 1: Sketch out the floor plan of your space with pencil and paper. Include doors, windows, columns, or other architectural features, like fireplaces or built in book shelves.
- Don't worry about it being 'to scale', just make sure you have plenty of room to draw your dimension strings. (So don't make your sketch too small.)
- Also, don't worry about drawing the wall depth right now. Interior walls are generally 5" thick, but unless you're renovating, this won't matter.
- I also want to point out that I like to add my dimension strings on the outside of my sketch because it feels more organized this way, but the measurements you're taking reflect what's on the inside of the room.

STEP 2: Measure from wall to wall. Grab a buddy if you need an extra hand, or place your tape measure flat on the floor. Mark down these overall dimensions on your plan as shown below.

STEP 3: Next, on each wall measure from one architectural feature to the next. For instance, measure from the corner of the wall to the windows outside edge, then measure the window width including its casings on each side, then from that window's outside edge to the next window, and so on. (Include the casing in the measurement of the window or door.)
You may want to take note of how thick the trim is around the doors and windows. (They are usually the same width around the room.)

STEP 4: Now make a sketch of the necessary elevations so that you can measure the heights of windows, doors and so on. (An elevation is a view of a wall as if you're standing in front of it looking at it straight on.)
Start with labeling your first wall elevation as 'A', then move around the plan clockwise to label the other walls 'B' 'C' and so on.
Once they're labeled, sketch out each wall including any permanent attributes, like windows, doors and even outlets and light switches if you feel that will be critical to your design.
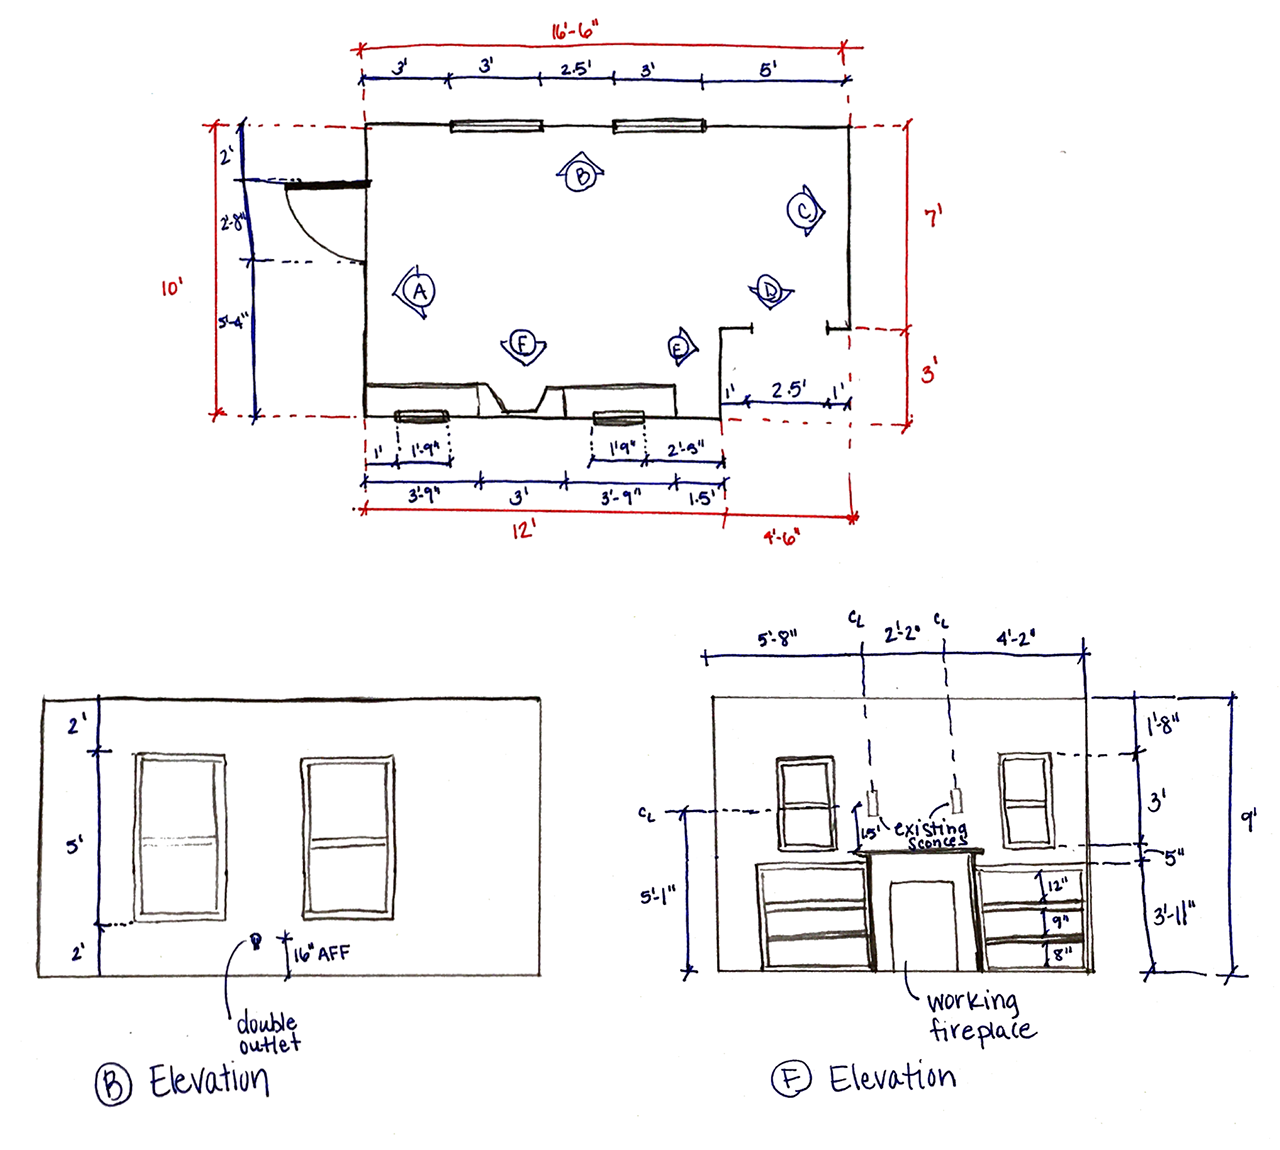
Your drawing can and should end up being a little sloppy. The above sketches are cleaned up for the purpose of this blog post. In generally my field measurements are barely legible to anyone but me, with notes sprawled all around. This is just for you to ultimately translate into a workable floor plan, so don't strive for perfect sketches! Just get the info you need, take some pics, and keep moving forward!
Step 5: Stand in each corner of the room and take photos. You'll inevitably miss some detail while you're measuring that you can possibly figure out by looking at your photos. Pop these pics into a folder in your project labeled "Before Photos".
You Have your Measurements. Now What?
What course you plan to take with your measurements now that you've taken them will depend on how detailed your drawings may need to be, and what you have time for.
AutoCad or Revit are the programs that professional architecture and design firms use to create digital drawings for their clients. They're excellent products, however they're expensive and come with a huge learning curve, so let's look at some simpler options.
When all you need is a simple interior floor plan to help with the planning and furniture selection process, I'd turn to one of these options.
- Floor planner
- Room Sketcher
- Pencil and Paper (Either using graph paper or an architectural scale.)
The 2 digital options above have really easy drag and drop tools for furniture, and the furniture sizes can be tweaked to represent the exact item you're considering. This is so crucial to planning!
They also both have the ability to pull your drawing up into 3D to visualize how the room is coming together. I think the learning curve for both of these products is minimal, and they're both really affordable.
I tend to enjoy working more with Floor Planner because I find measuring and dimensioning more flexible. Also, if you go with the digital route for capturing your rooms measurements, Magic Plan integrates with Floor Planner and will instantly create a floor plan based on this app's field measurements. It's like Magic. 🤓
Best of luck, and happy planning!
![]()