An Easy 3-Step Plan for your Airbnb Window Coverings
Jul 25, 2025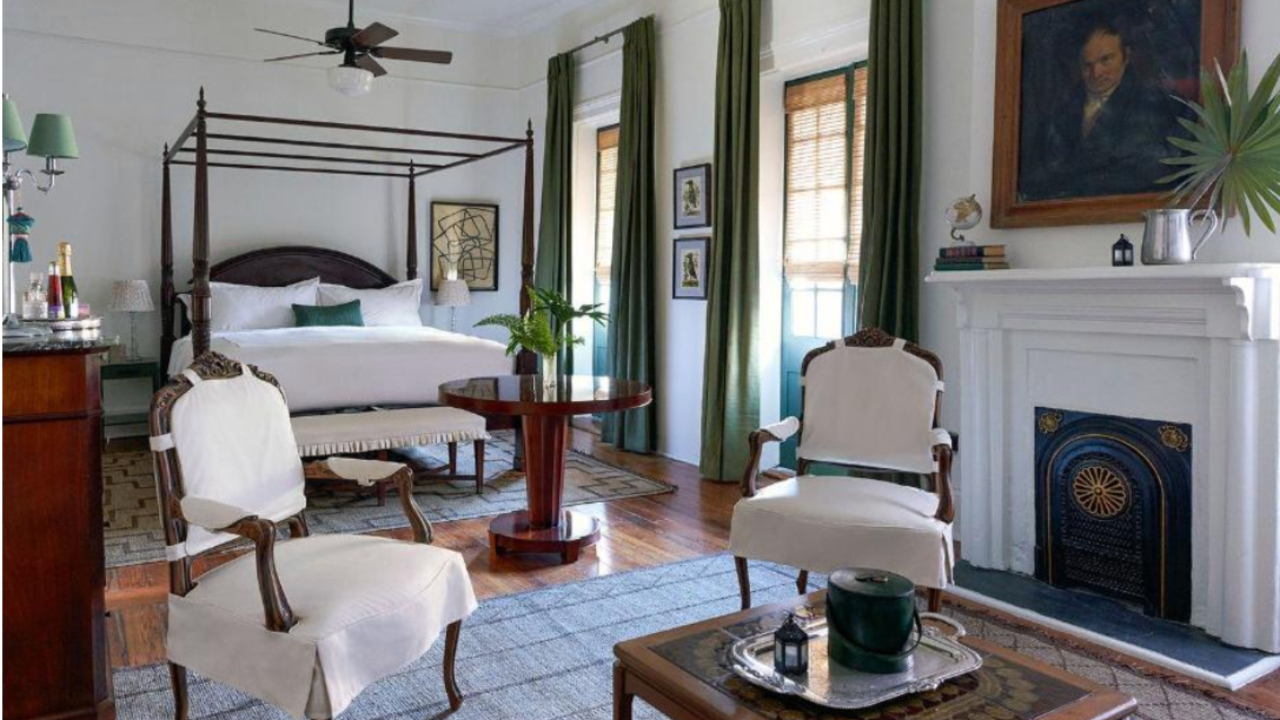
image above: The Celestine New Orleans
This post includes affiliate links. If you make a purchase after clicking on a product in this article, I may earn a commission, without affecting the product's price for you. Thank you for supporting my small business! 💗
Window treatments are one of those make or break decor areas... get them right and your room will feel complete and refined. But get them wrong and you're left with a space which looks chintzy and cheap. You obviously don't want your rental to look cheap. You want it to look polished, put together, cool, and most importantly: Guest ready. That's why you're here reading this blog, right? Right.
I've considered posting a round-up of the best 20 blinds and curtain panels, but I think maybe let's not complicate the issue. Best to cut to the chase and you've got lots of decisions ahead of you for completing the decor in your rental. So let's break it down...
3 EASY(ish) Steps to Layer the Right Window Treatments in Your Airbnb:
- Hard Blinds
- Curtain Rod
- Curtain Panels
EASY LAYERED WINDOW COVERINGS
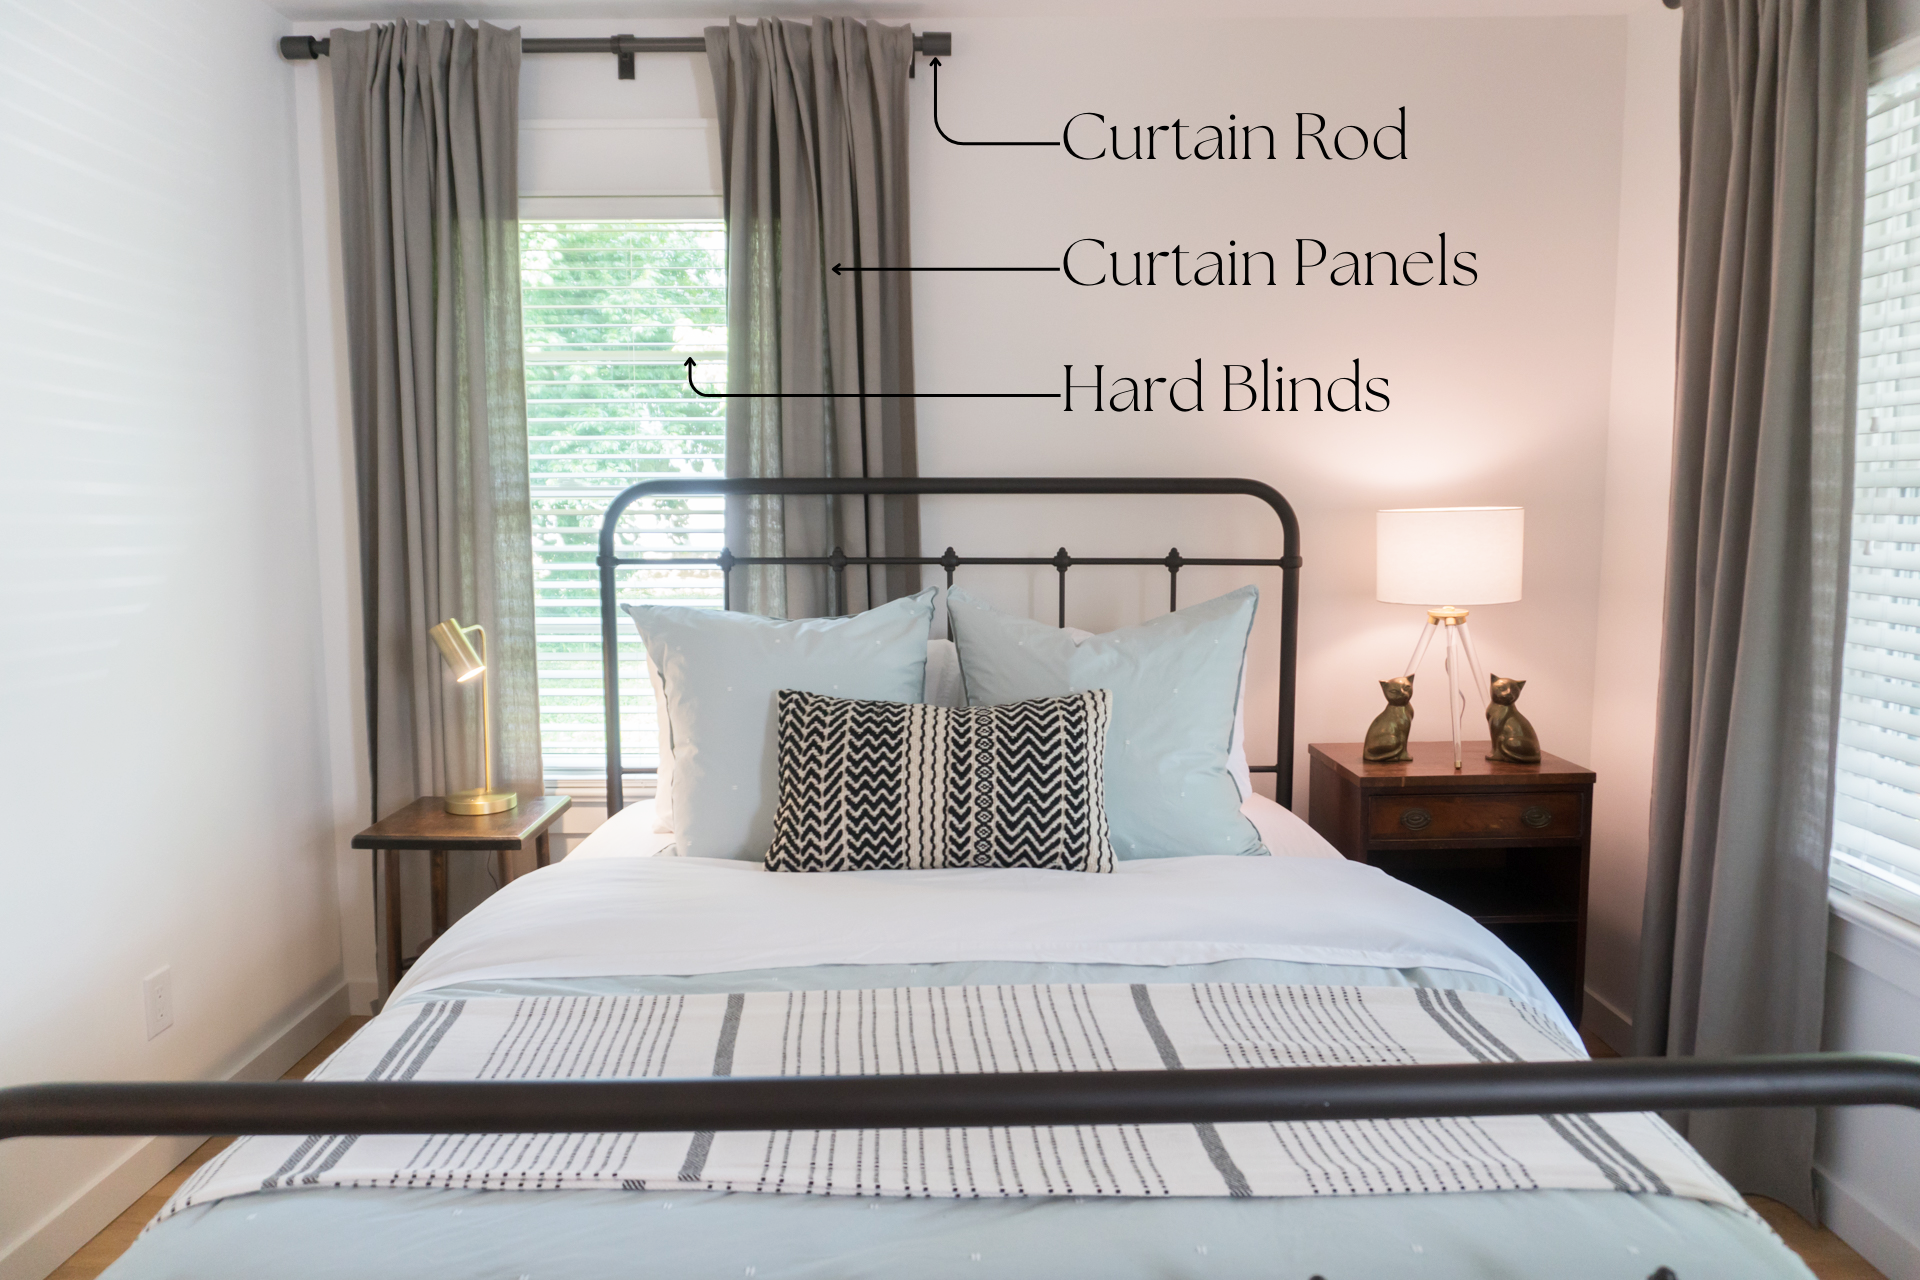
I say easy-ish steps because doing window treatments yourself isn't really easy. It's going to take some work. However, to help cut down on the time and effort you put into this process, let's narrow down the time you spend selecting the products to buy with a short list of no-fail options for almost any window or decor style, shall we?
Do you need all of the three things listed above on every window? Maybe not. But it's really nice if you can swing it because layering your windows this way will make them look more professionally done. Plus it gives your guests the ultimate flexibility on their own preferences for light, privacy and temperature.
However, at the end of this post, I'll talk more about some good exceptions to the use of all three.
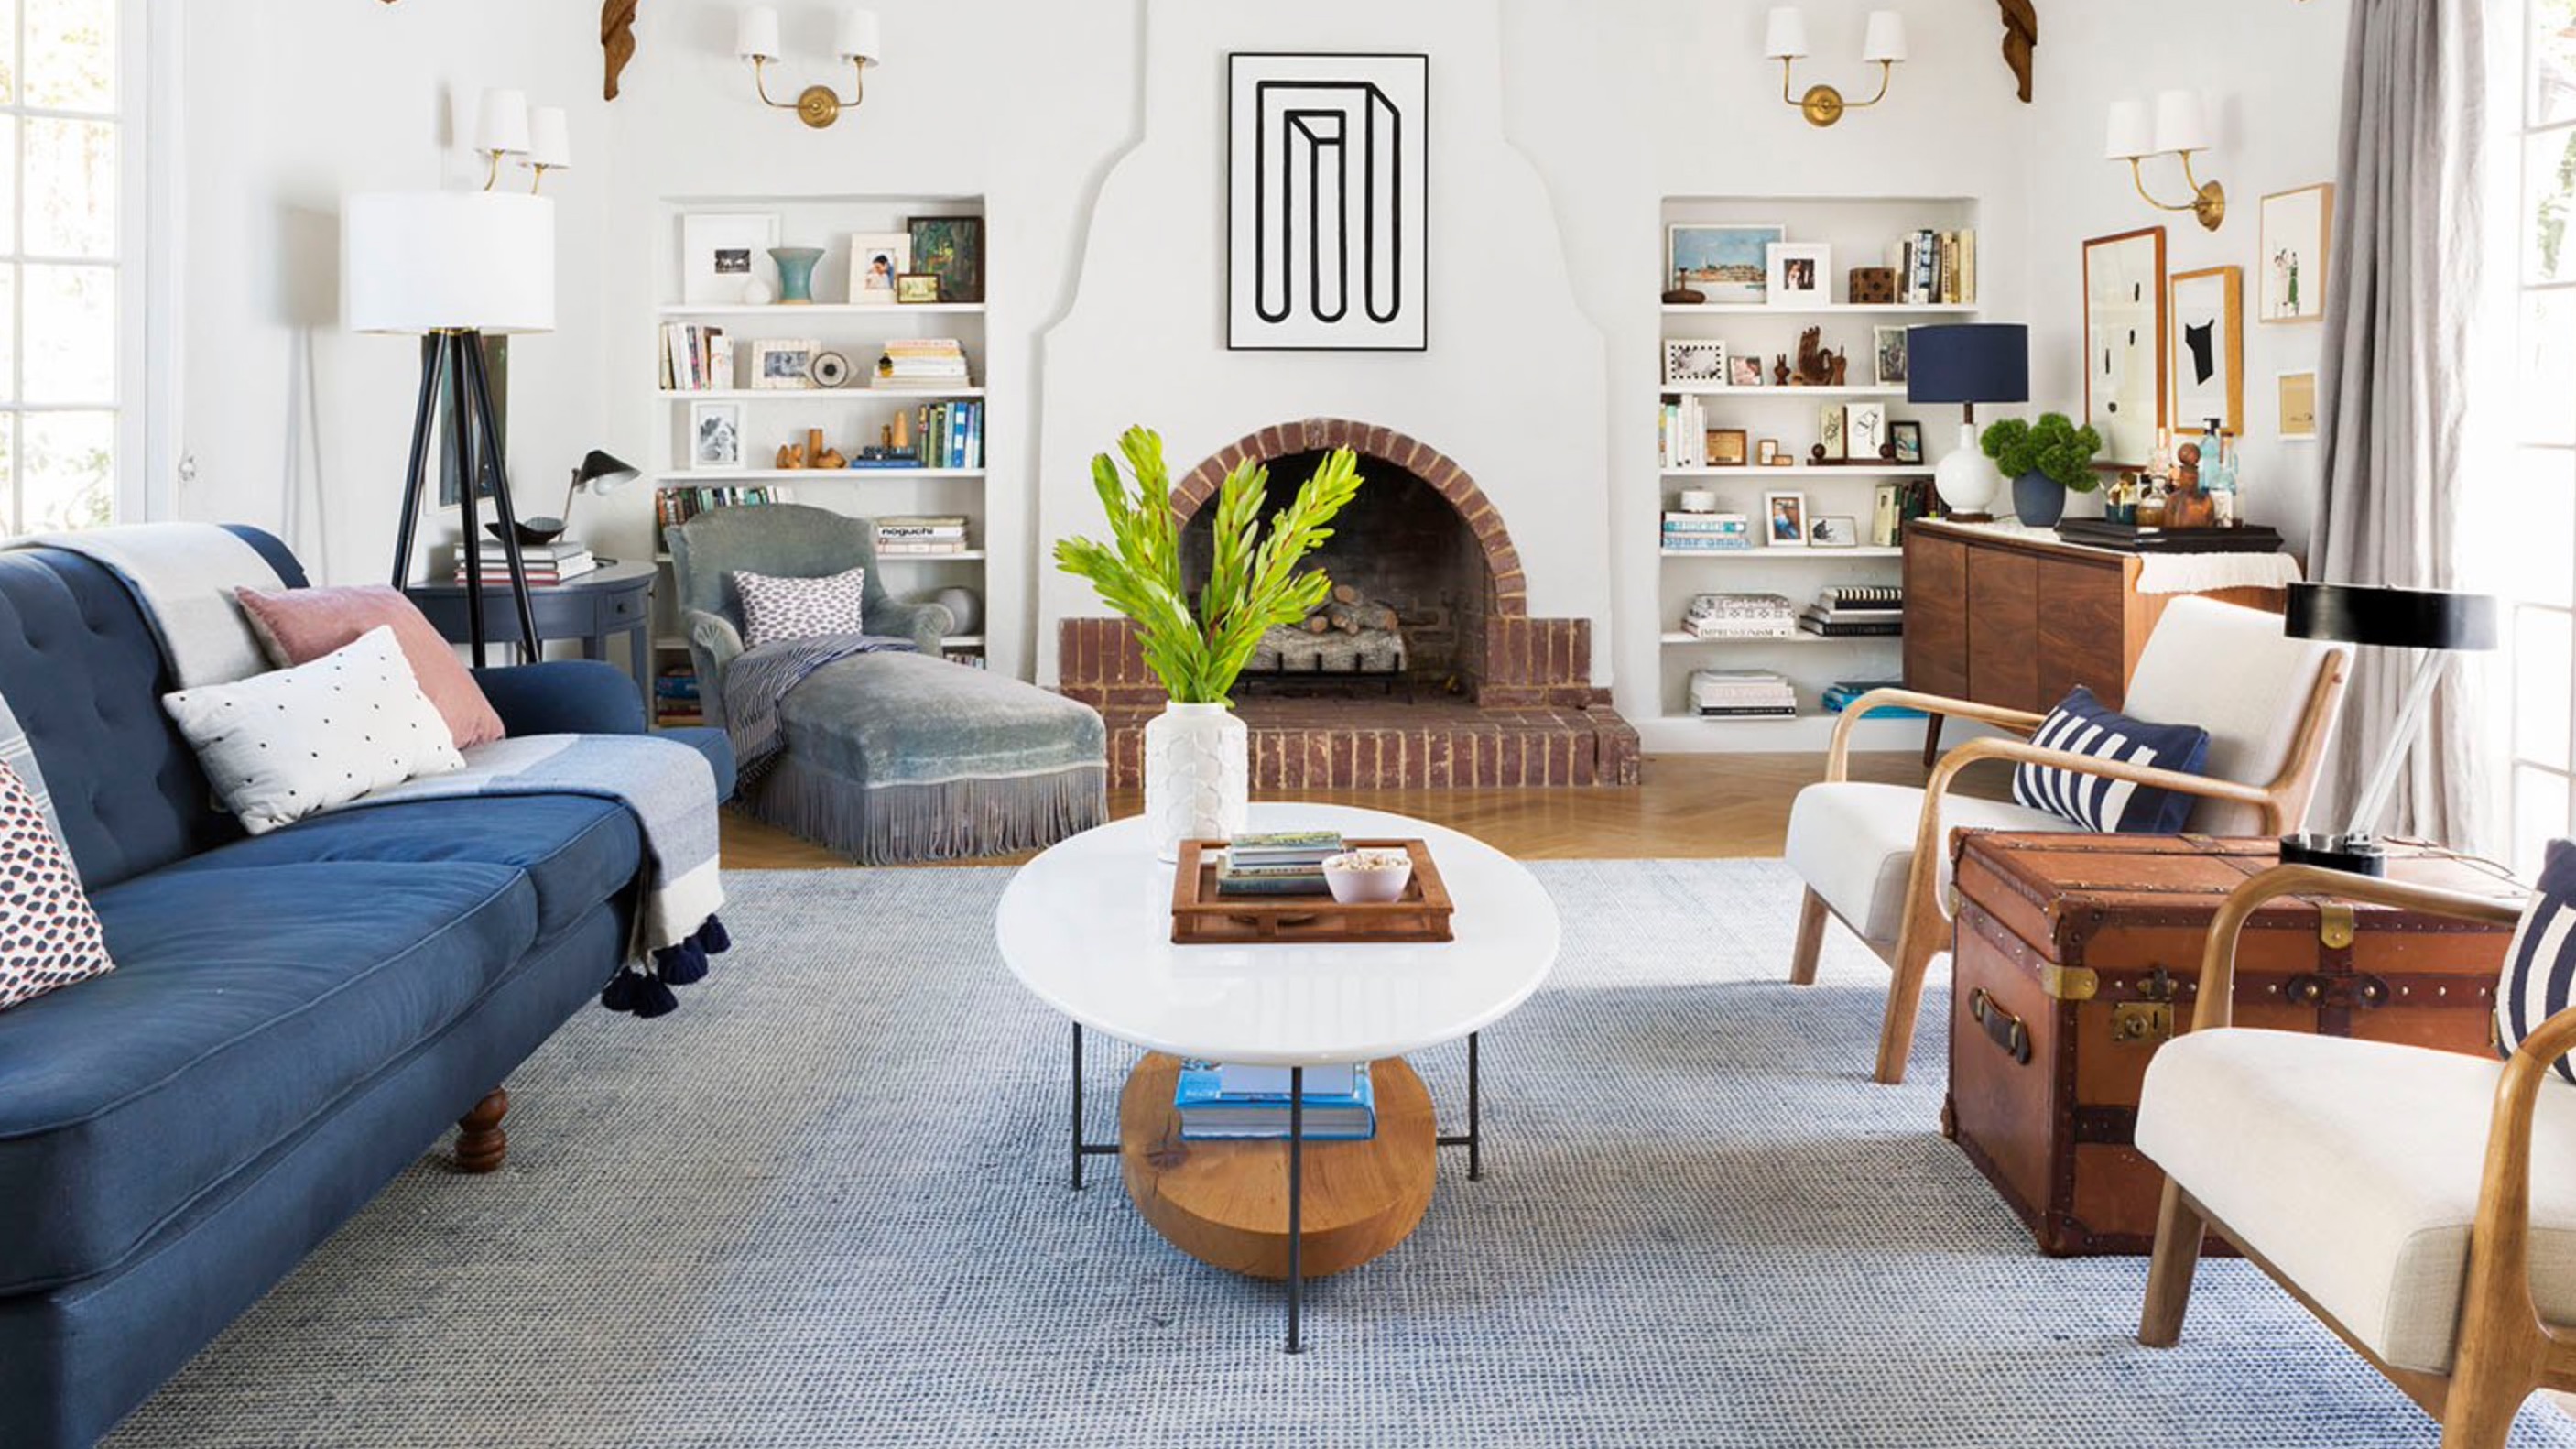
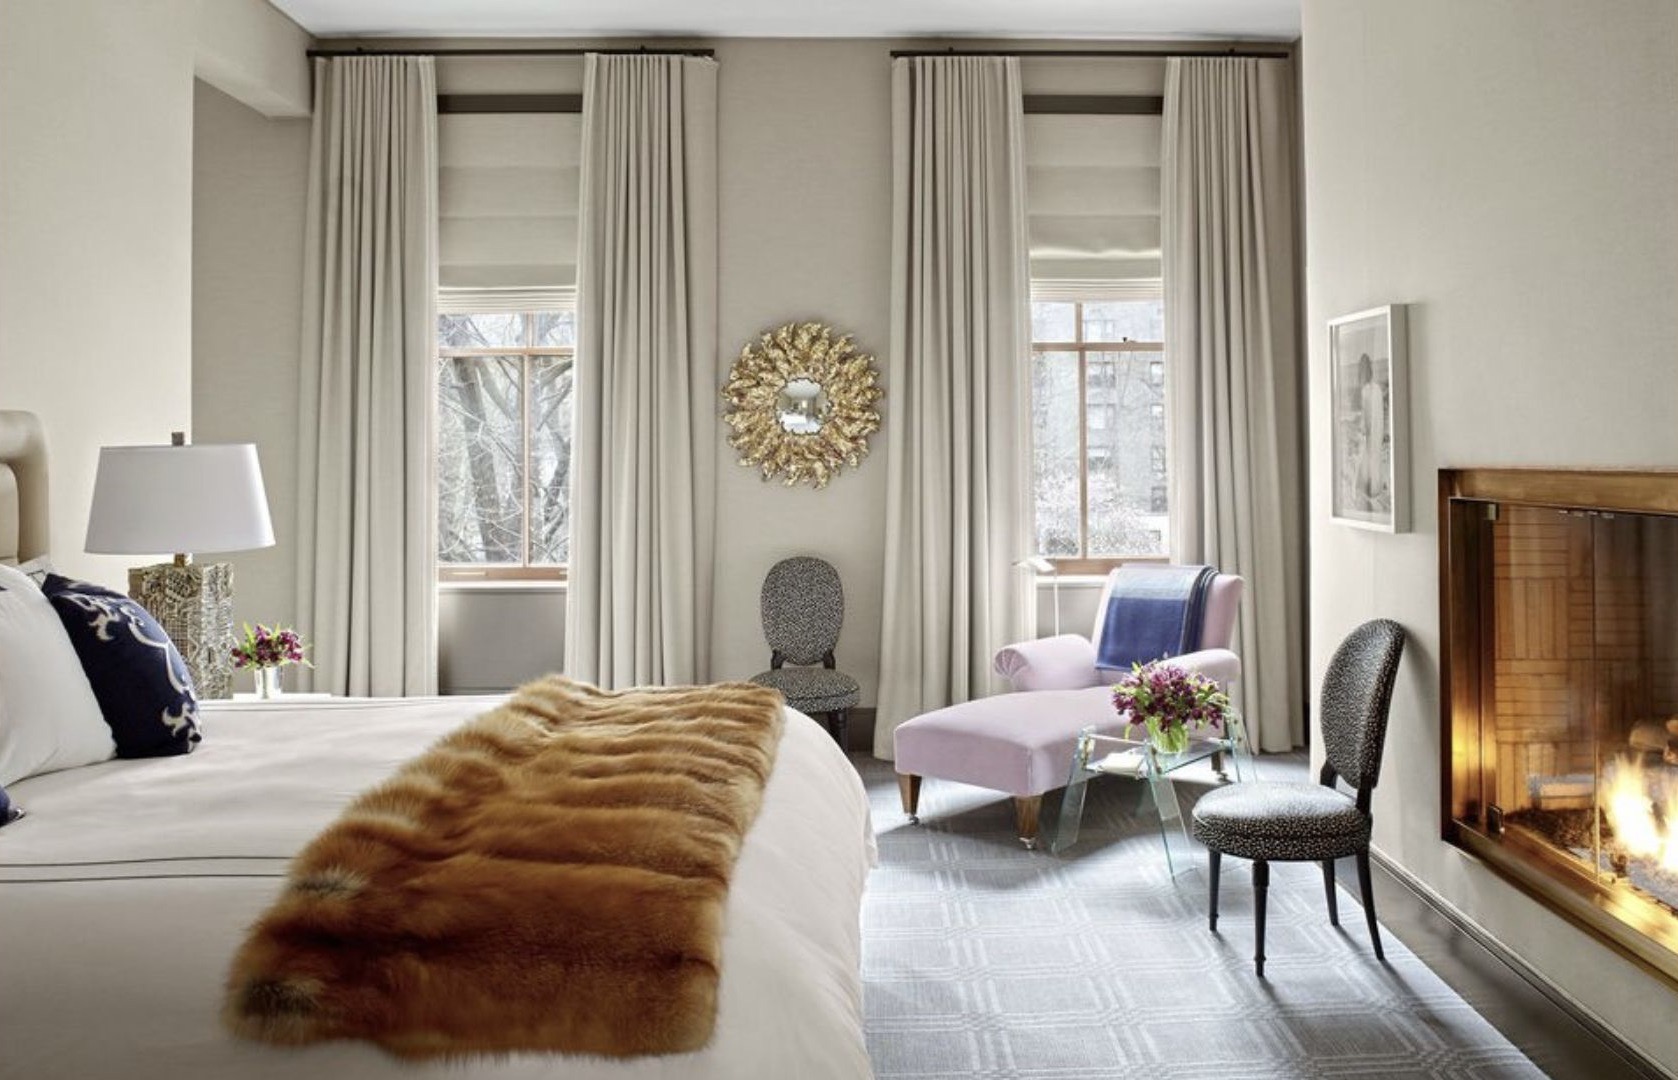 image above: Architectural Digest
Step 1: Hard Blinds
Hards blinds (or windows shades) are usually mounted inside the window frame, or just above it. They're most commonly made of vinyl, wood, bamboo, or fabric. Here are my 3 favorite options for Airbnbs.


above image: The Governor's Quarters from The Quill List
Tips and Tricks for Hard Blinds
- Mounting is done in one of two ways:
- Inside Mounting is most common for the majority of window frames.
- Outside mounting just above the window can look nice when you're using a bamboo shade. This makes the window look even bigger.
- For measuring hard blinds for an inside mount, you'll want to measure the width at the top, middle, and bottom of the window sill. All three measurements won't be the same; there's usually at least a 1/4" difference. You'll use the smallest measurement as your window width. (Blinds.com offers a sure-fit guarantee, which means even if you make a measuring mistake, they'll send you a new set of blinds to correct the problem free of charge. This really takes the pressure off!)
- If you're going with a fabric Roman Shade, extra curtain panels are not necessary. I will touch on this more at the end of the post.
- Other great shopping choices for hard blinds are Lowes, Walmart and Home Depot. (Home Depot and Lowes will cut them on-site for free if you have your measurements with you.)
- If it's a bedroom, go for room darkening. If it's a living space, don't buy room darkening because it's great to let natural light in even while your guests might want some privacy by pulling the shades down.
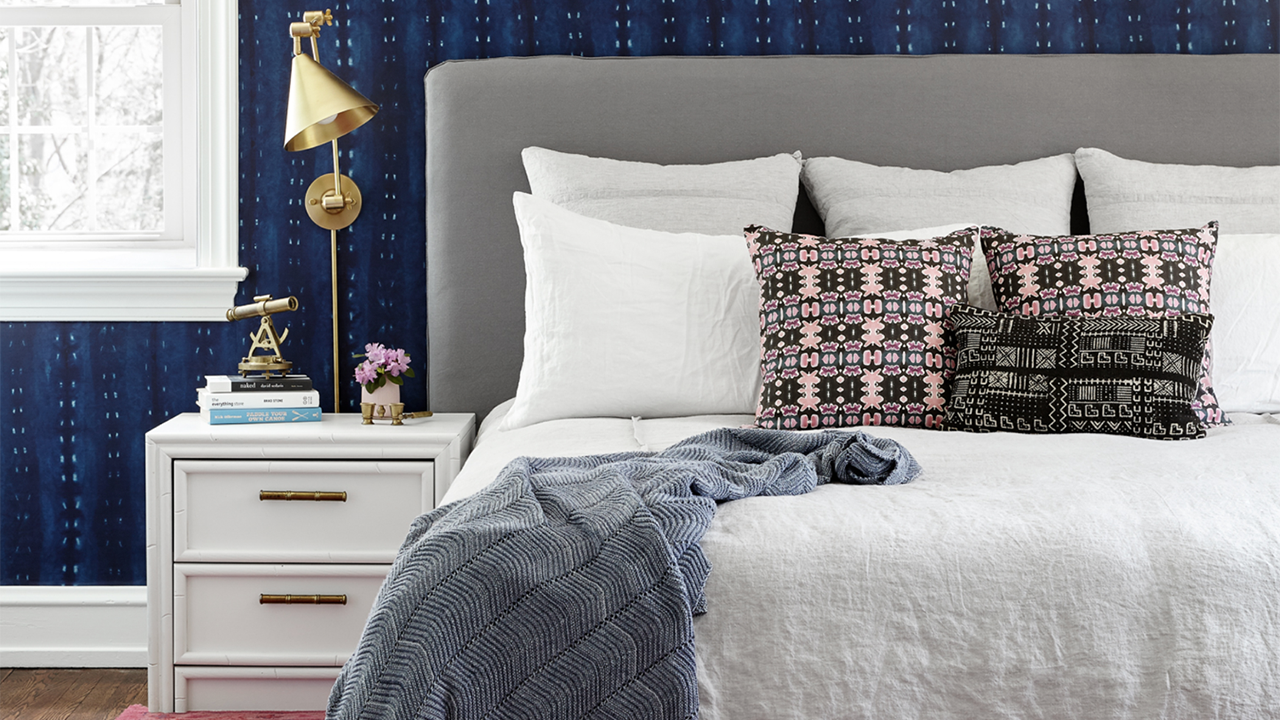
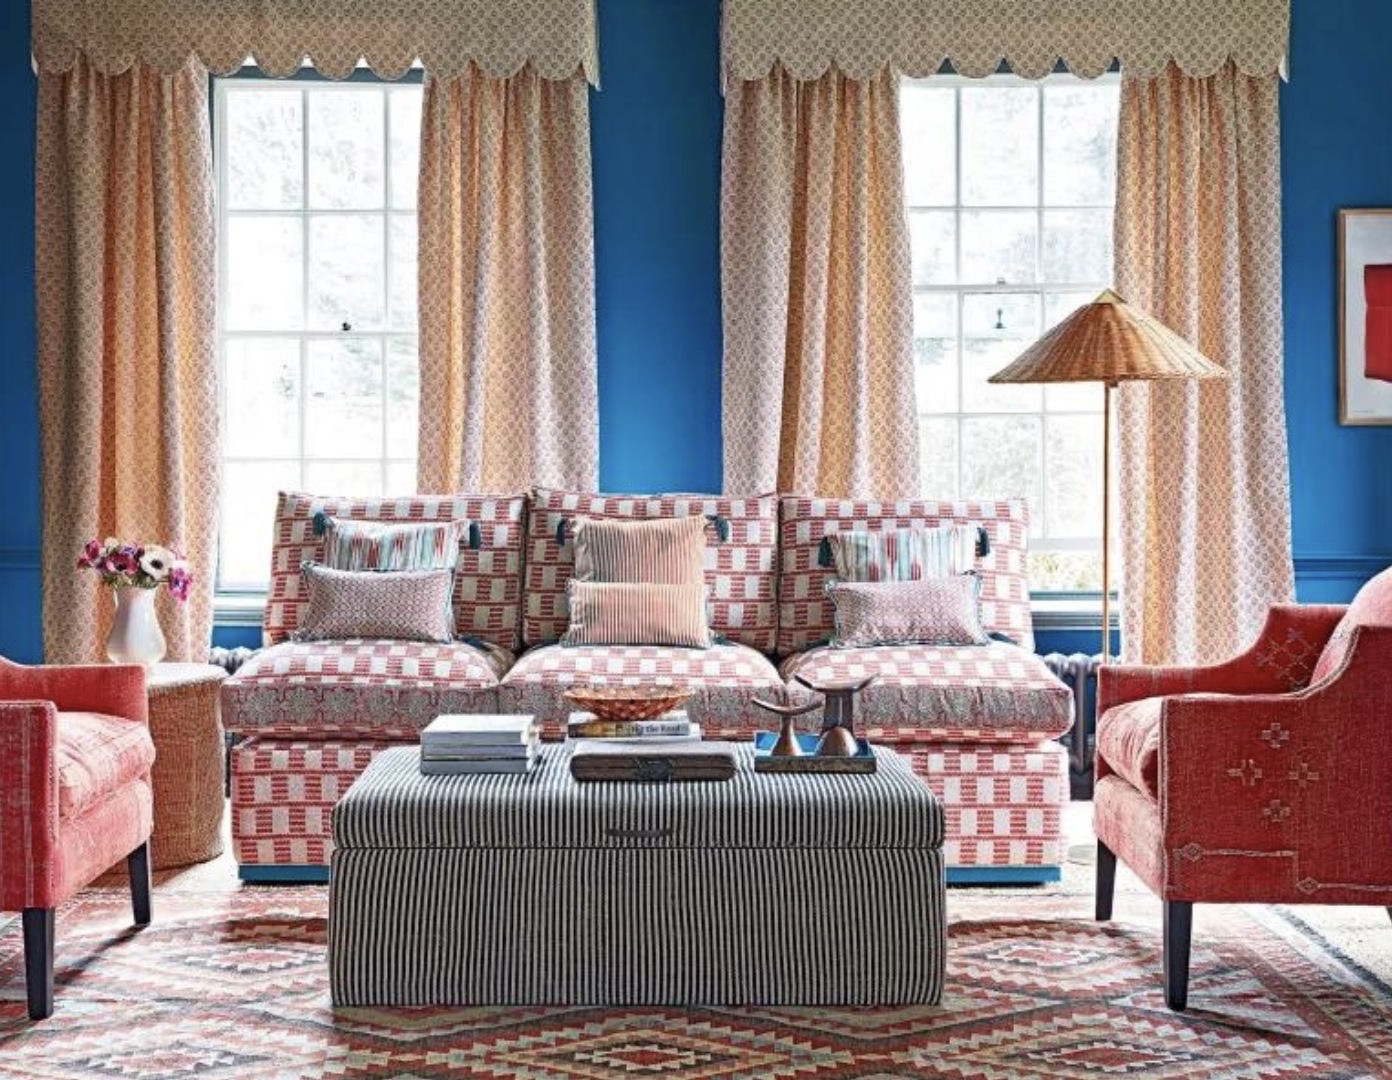 image above: Jon Day Photography
Step 2: Curtain Rods
When it comes to curtain rods, black is the new brushed silver. Simple black curtain rods are timeless! Don't worry so much about this decision, just choose one of the below options, or something similar, order, and keep on trucking. In addition to the nicer options below, here is a budget-priced simple rod from Target that I've used and it's a good bang for your buck.
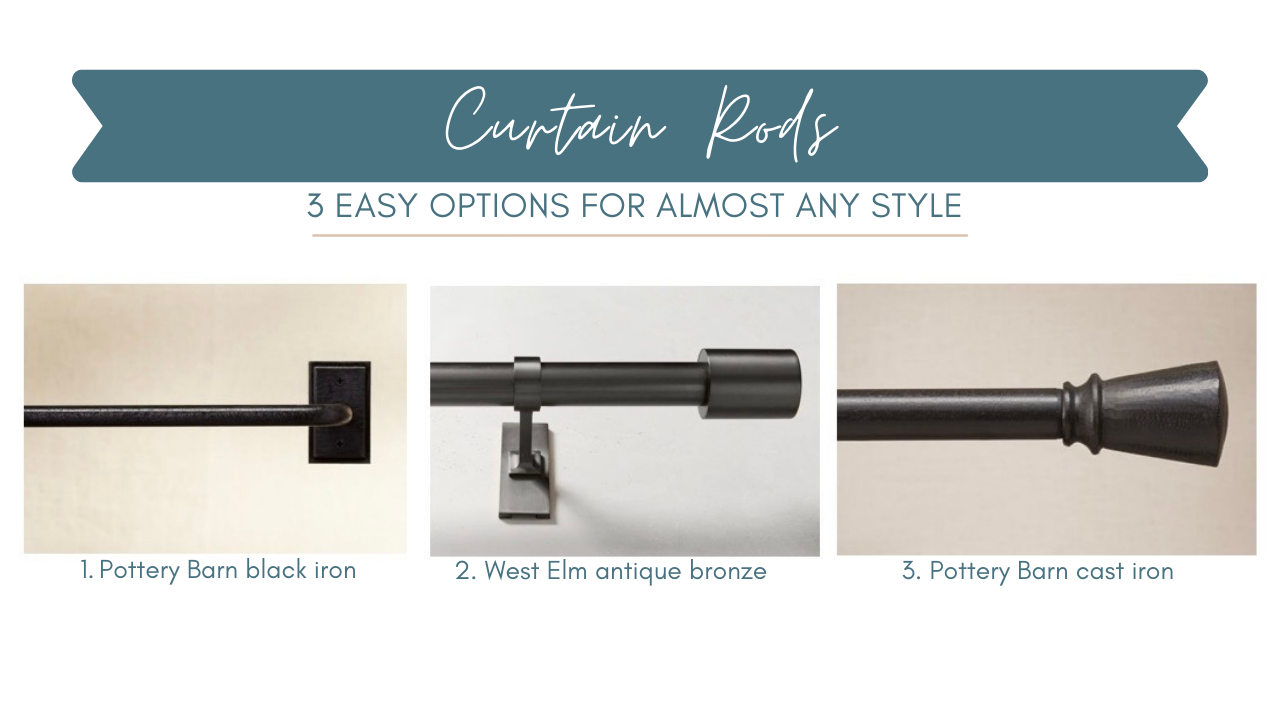
Tips and Tricks for Curtain Rods
- Do ensure you're ordering a wide enough rod for your window. Measure your window's width on the outside of the trim and add 12-18" for each side. That's how wide your curtain rod needs to be.
- For deciding on a mounting height, you're going to want to make sure you're doing this in tandem with your curtain selection so they reach the floor, which we'll discuss next.
Step 3: Curtain Panels
My first advice when it comes to curtain panels is to make sure the ones you order are at least 95" long.
Avoid stocked curtain panels that are 84" in length!!! No one needs this length hardly ever unless they're expecting a flood.
Go for longer panels that are 95" or 96" long and then hem them as needed. (You can hem them yourself, and no you don't need to know how to sew.)
This handy visual guide below is going to help you nail the positioning of both your curtain poles and panels...
Don't...

Do...

Unless you want your curtain panels to be one of your color pops in the room, or you think the room needs some more pattern or texture, don't stress over the simple beauty of a solid panel. They're always a win. And crisp white, buoyant, carefree panels tend to waft Bob Marley music right from the computer screen when you see them in a vacation property photo. Even if your spot is not near a beach or indeed any body of water, it's just a fact. White is nearly always a win for those looking to simplify this process with an end result that's still well done and highly photogenic.
I want to pause here and share that my FAVORITE window-covering resource is HALF PRICE DRAPES. I've been using this company for years and they supply reliable quality for WAY less than a 'designer' price for custom panels. I've done both their off-the-shelf products, as well as custom, and am always happy with the end result.

In the above beach rental, we used custom panels to make sure they covered the entire wall of sliding glass doors. Normally custom panels like this are VERY expensive, but these were so reasonable. And they met the ground at the perfect height because we specified the exact height we needed. I cannot recommend them highly enough, especially if you have a tricky glass door situation.
Other than Half Priced Drapes, I've also pulled together some other good options at various price points...Let's check them out.
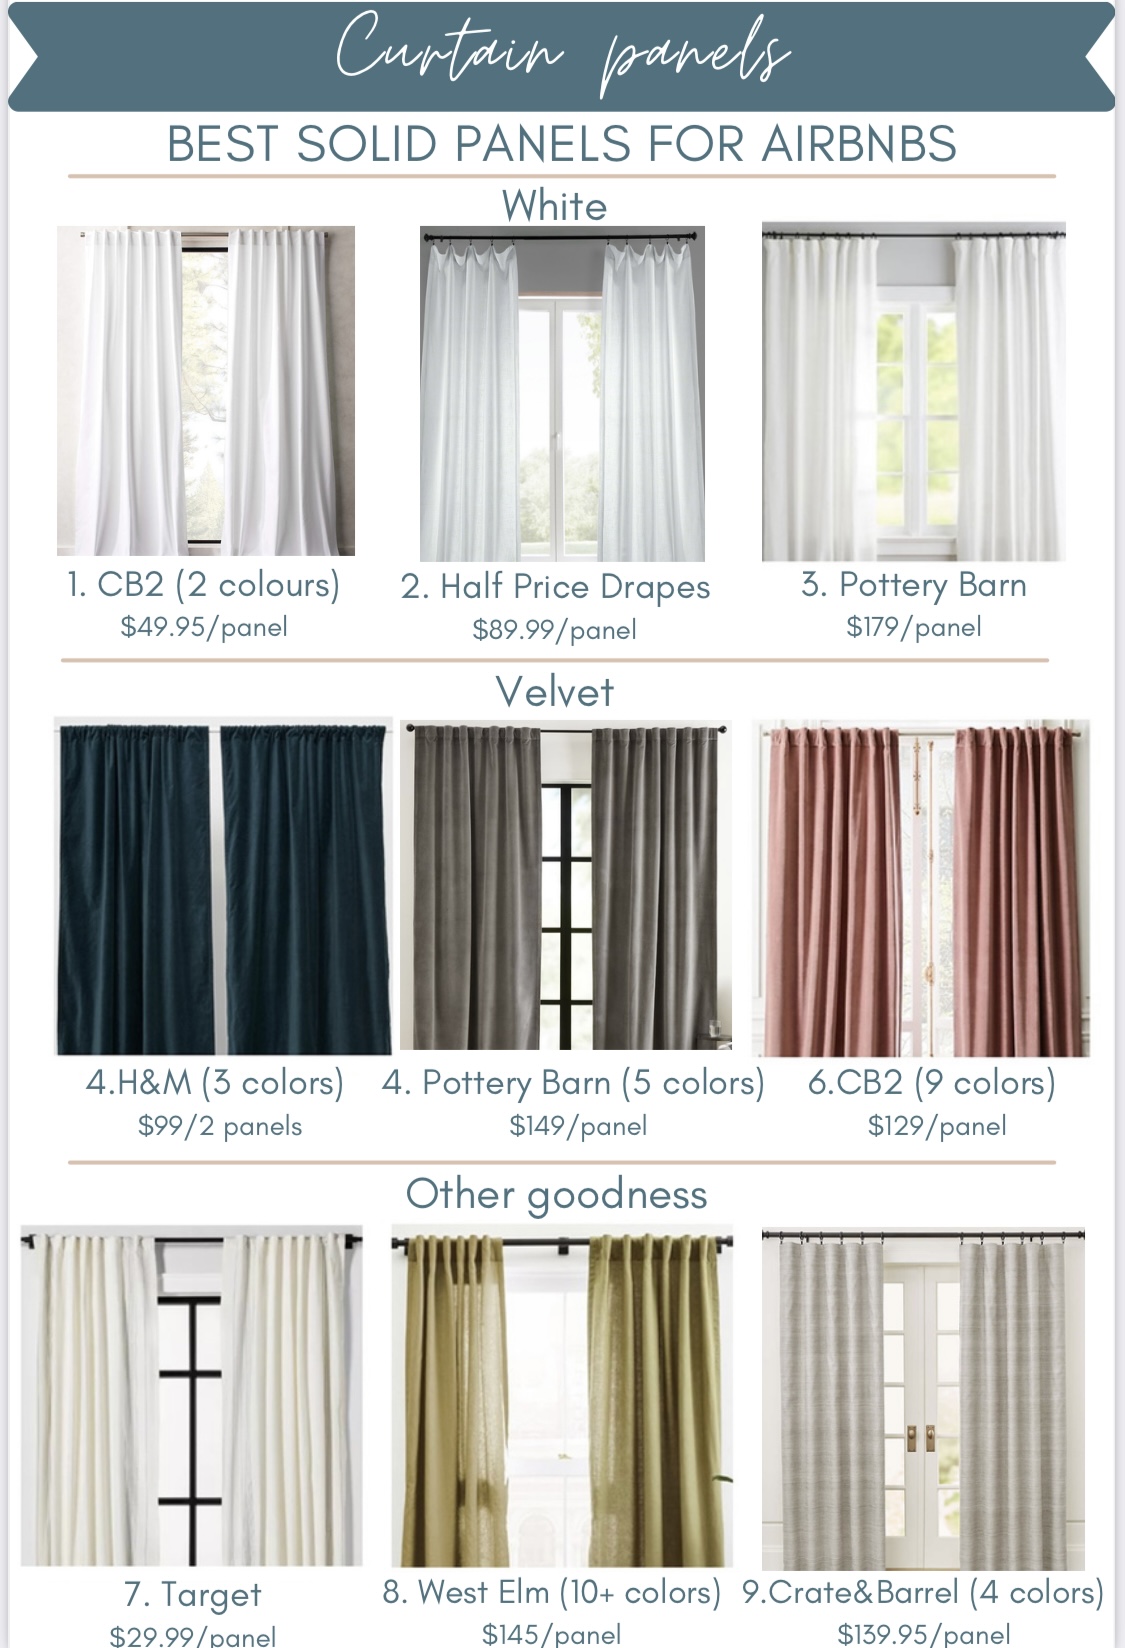
1. | 2. | 3. | 4. | 5. | 6. | 7. | 8. | 9.
Tips and Tricks for curtain panels
- Mount up and out. Go up nearly to the ceiling, unless that's significantly higher (more than 12") than the top of the window. Go out at least 12-18" on either side of the window frame. Again, this lets in more light and makes your windows look bigger, which in turn makes your room feel more grand and luxurious.
- Where the curtains break at the floor is very important. You can go for breaking right at the floor, or a little below making them sort of kiss the floor to one side. Never under any circumstance should a curtain stop more than just 1/4" above the floor. It's so strange and unfinished looking. Like you tried and you missed.
- If it feels important to you to wash the curtain panels from time to time, (not a bad idea in a rental) you're going to need to wash them in hot water first and then iron or steam them. If you're going with Ikea panels, this is especially important before you hem them to suit your space. They will shrink a lot—about 5 inches usually! If you do this in advance, they shouldn't shrink the next time you need to clean them, and you'll be all set.
- If your curtains are unlined, ironing on a hem is easy! Wash, dry, and steam as mentioned above, and then hang them on your rod. Once they're up, pin them in place where you'd like the hem to be. Then remove the curtains and iron the hem on. (This can also be done for lined curtains, it's just a little more time intensive.)
- If you want the very best detailed advice on the topic of making cheap curtains look great, head on over to Young House Love and read what Sherry and John have to say on this topic. They are experts at this game.

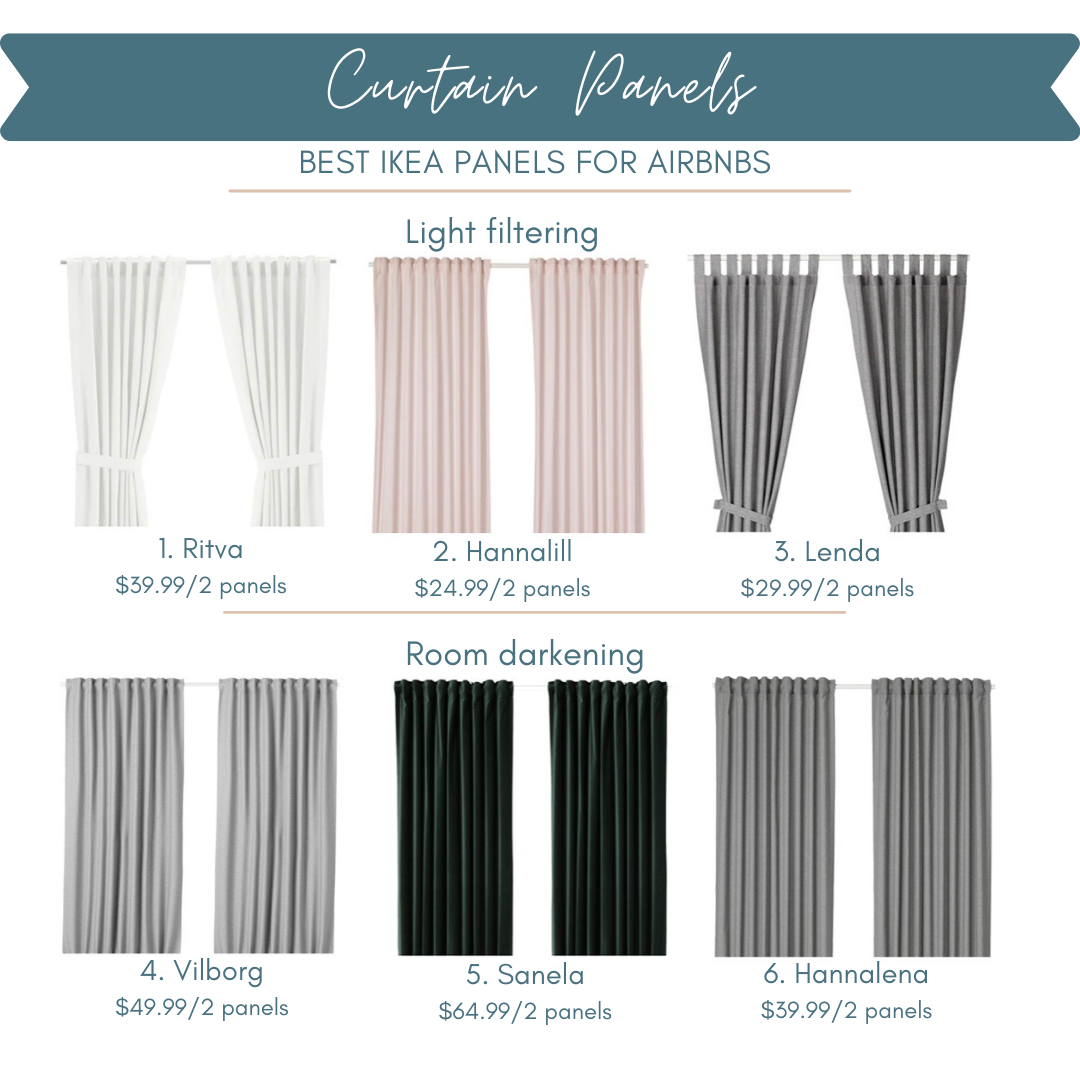
I'd be remiss not to share my fav Ikea panels! So here they are! Keep in mind that most of these come in different colors. The Lenda panels in white are what we used in the Airbnb pictured above.
If the Ikea panels you buy come with those country tie-backs, you have no option but to throw those in the trash immediately. Or find some cool way to upcycle them, but do not under any circumstances put them on your curtain panels!! Ick!
Some Exceptions to the Easy 1-2-3 Layering Method
Sometimes a window is in a weird spot that doesn't lend itself to any kind of curtain panels. Sometimes heat registers are in funky places, or ceilings have a weird shape and you'd end up having to go with some kind of major custom situation and spend 1/3 of your entire Airbnb furnishing budget on one set of curtains for one room.
So when you've got a lot going on around a window, I'd suggest going with a simple hard blind in that window and skipping the panels. If you want to upgrade from a 2" white faux-wood blind, go with a Roman shade, like this or this.

image above: Serena and Lily
What about curtains only and no hard blinds? Sure, that's an option too. I do think for privacy and light control -especially in bedrooms- that doing both blinds and curtains is ideal if possible. But if you're going with just curtain panels, consider upgrading to lined panels like these from Pottery Barn.
What about bathrooms? Just go with a 2" faux wood white blind. Easy, clean, done.
What if the window frame isn't painted white, but is stained wood instead? My first question is can you paint the trim? If that's not on the cards, because your husband swears he'll jump ship on this entire project if you mention it again, or just because it's too expensive, I get it.
If you've got wood-toned trim and it's staying wood-toned, then I'd suggest checking out what Emily has done with this gorgeous historic home on the blog The Sweet Beast. She does an excellent job blending her wood trim into her modern decor and ultimately makes everything look balanced and fresh.

image above: The Sweet Beast
So in summary, keep things simple with your windows! Form a game plan, add your window plan to your budget spreadsheet, and keep moving!
For even more interior inspiration for your vacation rental, check out my Pinterest profile.
Happy (Window) Decorating! XX